Tutorials for English test administrators
This is a Starters Guide for the administrators of organizational accounts.
If registered as an individual, please refer to frequently asked questions.
1. Get users into the system
TrackTest English is a flexible platform for managing the English tests of employees, job candidates, or students.
Before you start, you decide which format and type of assessment you need based on your use case.
Choose the format and type of the test:
a) Standard or Verified (Proctored) test:
The verified test added online proctoring (invigilation) and identity verification to your Core or Complete test, add + Verified credit (per exam).
The Verified exam option is recommended for higher-stake exams taken remotely outside your premises (from home, etc.).
b) Core test or Verified test:
Core test (Grammar, Reading, Listening)- Core credit required (annual license per user)
Cost-effective solution with immediate results
Complete test (Core + Speaking&Writing)- Core credit (annual) + S&W credit (per exam).
Complete assessment of all four English proficiency skills
c) Pre-test– short placement test (free of charge, no credits required)
It can be used in combination with the certificated tests or as a standalone solution.
When you have your user credits activated, there are three ways you can get users to start the English test:
1.1 E-mail invitation
Import users and send them the e-mail invitation via e-mail (no need to use activation vouchers, the license is activated when they click the link from the e-mail and start the test)
1.2 Voucher Code
Send them the voucher registration link (https://app.tracktest.eu/voucher) and the activation voucher code (the license is activated when they submit their voucher).
1.3 Custom registration link without vouchers
Users are added to your organizational account and can take the pre-test but have locked access to level tests and do not spend your credits.
Table of Contents
- Get users into the system
- Taking the test
- 2.1 Level test
- 2.2 Placement test (pre-test)
- Reports
- 3.1 USERS page
- 3.2 RESULTS page
- 3.3 GROUPS page
- 3.4 Lock/Open Status
- Settings
- 4.1 Test settings
- 4.1.1 User registration
- 4.1.2 Enabled levels
- 4.1.3 Time limit
- 4.1.4 Test type (random/static)
- 4.1.5 Young learners filter
- 4.1.6 Speaking&Writing module
- 4.1.7 Online proctoring (invigilation) module
- 4.1.8 Express delivery of results
- 4.1.9 Access to results
- 4.2 Company profile
- 4.2.1 Edit company profile
- 4.2.2 Orders (Order more credits)
- 4.2.3 E-mail notifications / Weekly reports
- 4.1 Test settings
- Other features
You can choose the method depending on your needs or combine them.
For example, if you decide you do not need vouchers anymore, you can delete the unused vouchers, and they will be converted back to the credits you can use for invitations.
In the following chapters, we describe in more detail which method you should choose for your organization.
1.1 E-mail invitation
For whom: The most straightforward way how to start. Upload the list of your users from excel, assign them the credits, and send them the e-mail invite from the system.
Pros: You decide when you want your users to take a test. Automatic user sign-in. Users just click on the link and start the test; no need to do a registration. You can invite users directly to the specific level.
Cons: You need to know the e-mails of your users.
Start with adding/creating users in the top left corner of the Users page. You can create them individually or use the bulk import of users from the Excel/CSV file.
Bulk import of users from the file in four easy steps:
a. Prepare the list of users in Excel in the format:
First column- e-mail address
Second column- first name
Third column- last name
The first column is mandatory, others are optional. Download this template in MS Excel.
b. Save the file as CSV
– Press F12 in Excel and the window Save As… pops up.
– in the list Save in format, choose the format CSV (comma separated) and save.
c. Upload the file to Tracktest
On the page Bulk import of users select the file and upload.
d. In the last step, you will get the table with new users on the screen. If they are correct, confirm creation and new users will be added to your corporate profile.
Invite your users:
When you have users in your account, select users and click the button Invite to test. You will have a chance to edit the text in the e-mail. At the end of this e-mail, the system adds the link to the test. The autologin link is unique for each user, so they should not forward it to others. Users are automatically logged into their accounts with one click.
You, as the administrator, can decide to invite your user directly to the specific level:
Invitations are sent from the e-mail invite@mail.tracktest.eu. We recommend users add this address to the contact list or safe sender list in their e-mail application to avoid ending up in the Spam folder.
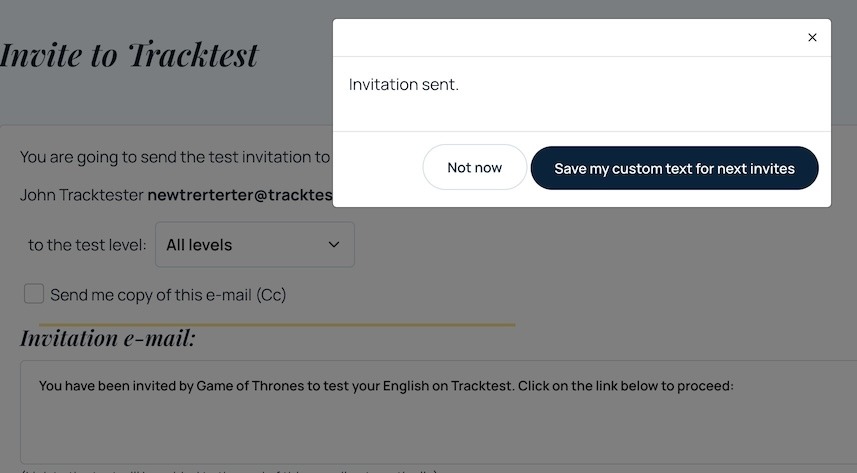
Admins can add themselves on carbon copy (Cc), so they get a copy of all e-mails (expect to receive 100 e-mails when you invite 100 people).
If you modify the default text sent to your users, you’ll be prompted to save your custom email text at the end of the invitation process.
Once saved, this custom text will be used for all future invitation emails unless you choose to edit it again.
1.2 Activate via voucher code
For whom: Bigger companies and schools, job candidate testing, proctored environments, users without e-mail addresses. Users create the registration at https://app.tracktest.eu/voucher (or your custom URL you can find in your company settings) and apply your voucher code at the payment gate. They are automatically assigned to your account, so you see their status, results, etc.
Pros: You do not need to know the e-mails of your users. Send them a registration link and voucher code, and they will do the rest. Users also see the value you are investing in their testing.
Cons: In theory, users could also remember the voucher code for their account and access it after the assessment. You can prevent it by locking the access (as explained in the chapter 3.5).
You create the voucher codes on the Users page. Select the number of vouchers you need (less or equal to the number of available credits). Created codes are added to the list of Users, from where you can export them into Excel or pdf. The number of remaining credits is decreased by the number of vouchers created. If you decide not to use them, you can delete them, and unused credits will be returned to your pool of available credits.
Once the user applies the vouchers during the registration, the code is attributed to the user. You can find it when you hover the mouse over the username, in the user profile, or in the exported file of users.
Where do candidates submit the activation voucher?
Users can use the dedicated page https://app.tracktest.eu/voucher (which also works with the custom voucher URLs) where they add their username/e-mail and voucher. This page works for both first-time registration and login of the existing user.
2. Taking the test
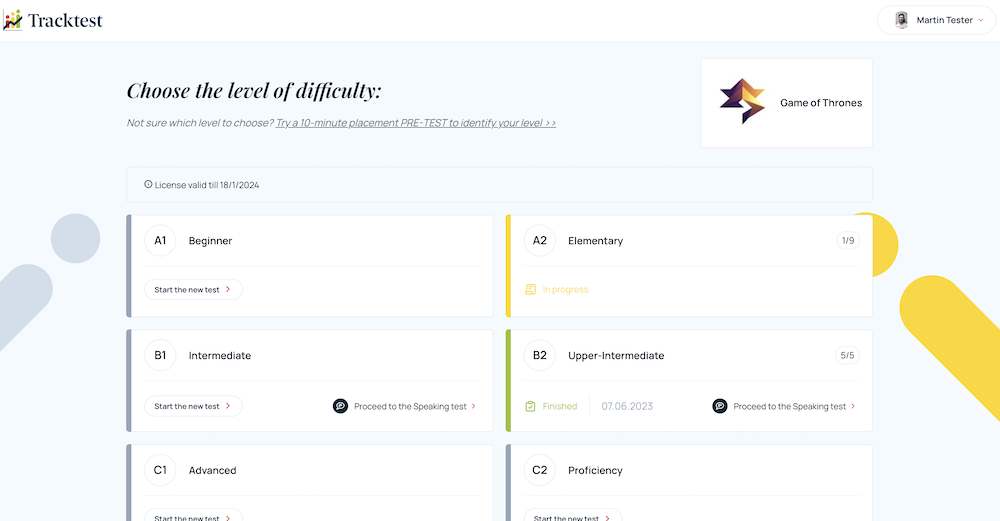
After activation, users see the Select level screen as their homepage with the name and logo of your organization, a link to the quick placement test (pre-test), and level tiles.
Colors indicate the status of the test:
Grey– not started
Yellow– in progress
Green– completed
Users can repeat each level 30 days after the previous level test completion. All not completed tests are closed after 30 days, and the status is grey again.
This screen can be customized in your Test settings where you can hide the pre-test and/or levels you do not want to show to your users.
2.1 Level test
Users can do any of the six CEFR levels. The same level can be repeated after 30 days after the previous completion (with different questions). Unfinished tests are closed after 30 days.
If your organization wants to offer only a limited number of levels, e.g., only B1 and B2, you can enable only the levels you need.
2.2 Placement test (pre-test)
If users do not know which level to start with, they can make an optional quick pre-test. This quick pre-test consists of 15 English grammar questions in three adaptively generated pages, i.e., the difficulty of English questions changes based on their previous answers.
Pre-tests should take at most 10 minutes of their time; as a result, the student will get an indicative CEFR level of English.
Users need to take the core or complete proficiency level tests for the other features- a detailed English assessment, weaknesses analysis, progress monitoring, and English certificates.
3. Reports
3.1 USERS page
The page Users is the main page for managing the users. Admins can activate and archive the users, monitor their status, and invite them to the test.
USER STATUS (types):
Active Users:
New– a user created but hasn’t started the test.
Invited– a user invited by e-mail invitation.
In progress– a user has started but not completed their last test
Completed– a user has completed the test.
Expired– the 12-month license has expired. Prolong their license using one credit per user or archive them.
Archived– users you do not need anymore.
Note: As per default, the User Status column shows only Active users. If you want to see also Archived and Expired users, change the column to All.
ARCHIVE AND RE-ACTIVATE USERS
Archived users cannot access their profiles and are not shown in the default view in the Users and Results tables. You can find them using the filter Archived in the Status column.
If needed, you can also re-activate them again, as shown in the video.
PROLONG USERS AFTER 12 MONTHS
The status of users changes to Expired after 12 months. It means their license has expired, and they cannot start new tests. You must assign them the new credit (Assign credits) if you want to continue monitoring their progress.
3.2 RESULTS page
You can find English test results for all levels on the Results page. There they can be filtered and exported to excel and pdf.
Key features:
Full-text search for names and groups.
Compare to previous. You can compare the results with the previous score and see the student’s progress immediately.
Date Range Selector. You can now filter the results based on the date of test completion. There are predefined options- Last Month (30 days), Last Quarter, Last Half-Year, Last Year, and any custom range.
Total Average. It is a total average of all scores shown in the table so you can easily find an average score for your company or school and the average score for any filtered results, e.g., for the specific group, department, or teacher.
Detailed results and date of completion. Hover your cursor with your mouse over the result, and you will see the test results for individual sections (grammar, reading, listening, speaking, writing) and the date of the test completion.
You will also find the section details if you export the file to Excel.
Top TTS. It shows the best TrackTest score for the selected date range from all levels.
Download all test results. You can find the downloadable list of all test results, including the section scores in the CSV/xls format below the Results table.
Tip: The default date range for showing the result is six months. If you are looking for older results, remember to change the date range in the date range selector.
3.3 GROUPS page
When you import your users, you can optionally assign them to groups (departments, classes, teachers, etc.). One user can be assigned to more groups (e.g., in the group Sales and NewStarter). Groups can represent your class, teacher, department, location (or all of them). They can be handy if you want to filter your users quickly, share select results, or delegate some of your management tasks to other people.
Create a new group
a. Go to the section Groups in the header and create a new group
b. Name your group and save it. In this example, we will name this group NewGroup. You can also optionally add your users to the group here, but since we want to filter them based on their last test results, we will leave other fields empty for now.
c. In the Results page, filter users based on their results and add them to the group.
For example, we filter all users who achieved a result worse than 40% at the A2 level. Check them and click on Add to group button.
d. Select the group and confirm.
Mission accomplished. Users are now added to the group NewGroup. You may also want to share the results of the select group with a specific person, e.g., their teacher or team leader. You can do it by assigning them as their group admins.
3.4 Lock/Open Status
With this feature, school and company administrators can lock the access to tests for all their users and unlock it only when they want their users to take the tests.
4. Settings
4.1 Test settings
Test settings enable further customizations of the user registration flow and the tests themselves, addressing various needs of organizations. Changes are active immediately after you save the new settings.
4.1.1 User registration
This section is helpful if you get new users via custom registration/voucher links. You can skip this section if you use the users’ import with e-mail invitations.
Available customizations for the registration link:
- Require E-mail (if disabled, any username can be used for registration instead of e-mail)
- Require First and Last name (if disabled, first and last names are optional items)
- Require Phone (if disabled, users do not submit their phone number during their first registration).
4.1.2 Enabled levels
If you know that you will test only the specific level or levels (e.g., B2), you can hide other levels for your users. All your users will see only the enabled levels.
4.1.3 Time limit
A time limit for the English proficiency test is optional for all company and school accounts. You can set the maximum time duration of the English test in minutes for your users.
The countdown starts from the moment when a user enters the Core test. They cannot pause the test; therefore, users must focus more on its completion.
If you consider using this feature, make sure that your students and users have conditions where they cannot be interrupted or disturbed. If their time expires before the completion of the test, the remaining questions are flagged as incorrectly answered.
You can set the time limit for pre-test and Core tests. It automatically applies to all new tests and all users from your account.
4.1.4 Test type (random/static)
TrackTest English proficiency tests are, per default, generated from our extensive pool of questions and items using our unique algorithms. These tests are of the same difficulty but never the same, with different questions and sequences of tasks.
However, there are specific use cases where the test administrators want to serve the same questions to all their testees. For instance, you want to ensure 100% fairness during the admission or final exams taken at one time at your premises. There is no risk of cheating, so that you can serve the same questions to all your test-takers. You can change the test type to Static in your company settings for these scenarios. When saved, a test with one set of questions per level will be served to all your users.
If you want to change the questions in the Static test, e.g., for the new assessment round, click Re-generate static tests, and the tests will be re-generated for all proficiency levels. In the settings, you will also see the date of creation of your active set of questions.
4.1.5 Young learners filter
Test for young learners is an optional free feature available to all school administrators in their interface.
The Tracktest English proficiency test in its default configuration assesses English proficiency in both professional and personal life. Therefore English tests, particularly in the upper B and C levels, also use some questions related to general business English knowledge.
This area is essential for adult learners but could be a disadvantage for young learners who, despite being adequately English proficient, do not get involved with such vocabulary and topics and hence could score worse results.
We have introduced a filter for young English learners to prevent this discrimination. When selected by the school admin, the system selects from the questions databank only the questions suitable for young learners.
Account administrators can turn the Young Learners filter on and off in their organizational settings.
4.1.6 Speaking&Writing module
The Speaking&Writing test is the optional module to the core tests. In your admin account, you can make it visible or hidden for your users.
- Enabled– your users will see the option to proceed to the speaking and if you assigned them Speaking&Writing credits, they could proceed to the Speaking test after completing the Core test.
- Disabled– your users will not see this option at all.
4.1.7 Online proctoring (invigilation) module
The Online Proctoring module is optional for assessments requiring enhanced security, especially if taken remotely. TrackTest verifies the test-takers’ identity and records their actions using a front-facing camera. In your admin account, you can make it visible or hidden for your users:
a) Standard means that the online proctoring is disabled, and the test is provided as is, without a camera and identity verification.
b) Proctored shows only the Verified exam option (with the camera, identity verification, and mandatory time limit).
c) Both- with this option, users will be able to choose which type of test they want to take.
You need to assign Verified credit to users to access the Verified exams. One Verified credit is spent for each successful level test (with a score above 65%). Tests with a score below 65% are not submitted for verification (status Not for verification) and do not spend the Verified credit. Admins have access to the log of their users with actions and pictures recorded during their test.
4.1.8 Module Express delivery of results
If you use Speaking&Writing or Verified exams and need the final result for the specific candidate urgently, you can assign the Express delivery credit to the specific test. You will get the results in less than 48 hours. Activate the feature in your test settings and the option to order Express credits will show in your order form.
4.1.9 Access to results
You can decide if you want your users to see their preliminary and final results and download the certificates. If disabled, your users will get only the information that they completed the level. They will not see their result and cannot download their certificate.
4.2 Company profile
You can find this section in the second tab of the Settings page.
4.2.1 Edit company profile
Admin can see and edit the profile of their organization. Click Edit profile to change the address, upload the new logo, or change the custom URL. If you need to change the name of the account, please contact us.
Tip: Remember to upload your logo. It is displayed with your organization name during your users’ registration via the custom link and in the footer of each certificate.
4.2.2 Orders (Order more credits)
In the section Last orders, you can see all your orders, remaining credits, and when they expire. (Expiration time is 12 months from the activation date).
4.2.3 E-mail notifications / Weekly reports
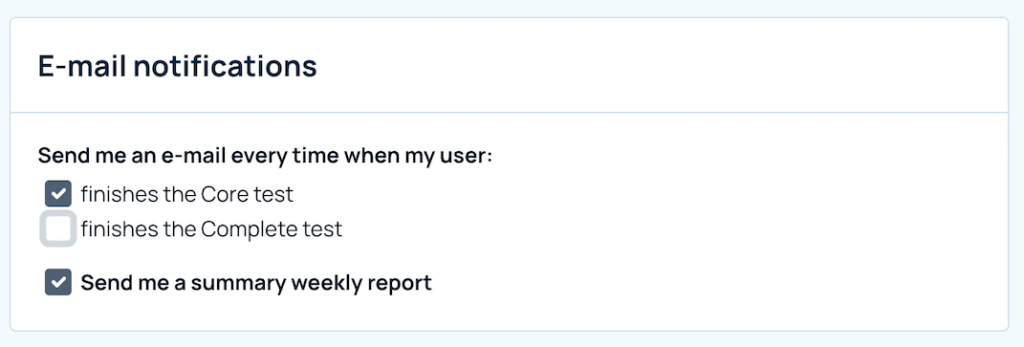
You can subscribe to the weekly report in the .csv format about the activity in their organization (users added, tests taken, used licenses). The report is generated weekly (Monday-Sunday) and sent to the admin e-mail address. If there is no activity, the report is not generated.
For instant information about the completed tests, admins can subscribe to the individual notification where the platform sends the e-mail to admins every time when their user finishes the Core or Complete test.
5. Other features
5.1 Admins and super admins
Create an additional group admin: Super-admin can make a group admin from any user in their organisation. In the Edit User Profile, add the applicable group(s) and select the Group Admin checkbox.
Group admins are still displayed in your list of users but are highlighted with an asterisk (*).
Create an additional super-admin: A new super-admin person needs to register at Tracktest as an individual. Afterwards, please send their e-mail to your Tracktest account manager or support, and they will get them upgraded to super-admin of the organisation. The list of active super-admins can be found in your company profile.
Super-admins and their results are not displayed in the list of users.
WHAT IS THE DIFFERENCE BETWEEN ADMINS AND SUPER-ADMINS?
Group Admin is a user with special rights for a specific group.
What Group Admin can do:
- See the test results of members of their group only
- Invite their group members to test
- Access and export their group member results to Excel or pdf.
What Group Admin can NOT do:
- see users outside of their group and their tests
- add new users to the company profile
- order new licenses
- edit company profile
- add and remove users from the groups.
- If the group admin is interested in the individual user details, this can be found by clicking on username/e-mail (including the entire test history, progress charts, and weaknesses analyses). Ad-hoc company or group analysis of language weaknesses (see the case study) can also be provided upon request.
5.2 Weaknesses analysis
In the Feedback section of the user profile, the admin can find the three weakest topics, i.e., categories they have made the most mistakes in during the last 12 months. They are selected from their test results out of approximately 20 grammar, reading, and listening topics in all levels and algorithmically recalculated, reflecting the difficulty of the test levels.
The section also includes the simplified (non-scientific) definition of the topic, a few sample sentences, and recommendations on improving their result.
5.3 Progress tracking
Tracktest uses the universal Tracktest Score (TTS) for better progress tracking of users across the levels.
With the Tracktest Score (TTS), you can track the progress across the levels. It is a dynamically calculated numeric score from 0 to 1200 using the algorithms based on all other user results and reflecting the difficulty difference among the levels.
A chart of user progress shows the best result each month with the completed tests and the best and last achieved scores.